Terminal Heaven Part 3: zsh and oh-my-zsh
In the last and final part of this series I will write about a part of my toolset which made my daily work with the command line a lot more productive then before: the zsh shell and especially oh-my-zsh which is a configuration system for zsh.
I’m working with Unix shells for a long time now and have always been a fan of the bash shell. Sometimes I tried one of the other shells to see if they are better suited for my needs but after a short time I always returned to the good old bash. I even tried the zsh shell once but the feature set is so overwhelming and the learning curve was so steep that I gave up on this very quickly.
Reading a lot about oh-my-zsh made me giving the zsh shell another try. One of the biggest problems in starting using zsh is that the default configuration is not very usable and you will have to spend countless hours before you have a usable setup for yourself. oh-my-zsh fixes this by providing a useful default configuration from the start and it also gives you a lot of plugins and themes which are all provided by an active and growing community.
I won’t provide a tutorial of how to use zsh here but I will show you some features which are my personal highlight of my zsh/oh-my-zsh setup.
Directory Navigation
One of the things you will do the most when you are working on a shell is changing directories. zsh can help you in multiple ways doing this. For example:
- zsh tries to fix your typos
- no need for the “cd” command
- Typing “/App/Saf+<TAB>” will expand the path to “/Applications/Safari.app”
- The “d” command gives you a list of the last used directories and you can change to each dir by just typing a single number (1 is always the previous dir)
I also defined “p” as a directory alias for my project directory which gives me the possibility to just type “p/code+<Tab>” to expand the path to the directory of this website and a single press of return will change the path to this directory.
Customizable Prompt
oh-my-zsh provides a lot of themes you can use to customize the shell to your own liking. I’m using the “fishy” theme though it’s not that fancy but the prompt is exactly how I want it to be. It looks like this:

On the left you see the usual stuff like logged in user and the current path. On the right side you can see the current git branch and status of my project.
Globbing
Globbing helps you selecting files matching a specific pattern. The zsh globbing is very powerful and everybody should try to learn at least the basics of this feature.
The following example selects all png files recursively and copies them to the backup directory:
> cp **/*.png backup
Command Arguments Completion
With the command arguments completion it is not necessary anymore to remember all command line options of a shell excecutable. For example if you enter the following:
> ls -<TAB>
You will get:
-1                        -- single column output
-A                        -- list all except . and ..
-B                        -- print octal escapes for control characters
-C                        -- list entries in columns sorted vertically
-F                        -- append file type indicators
...
This kind of completion is available for a lot of commands like git, svn, brew. The completion is very powerful and it also works for git branch names or it substitutes a process name with the process id when used with the kill command.
search-history plugin
The search-history plugin is the most powerful oh-my-zsh plugin. It basically provides a substring search in your zsh command history. To activate it just add the following line to your “.zshrc” file:
source $ZSH/plugins/history-substring-search/history-substring-search.zsh
From now on it is very easy to get an old command from your history. You can type in any text and use cursor up and down to scroll to all matching history entries. For example if I want to update my homebrew installation, I just type “out” followed by cursor up and most of the time the next matching entry is “brew update && brew outdated”.
The End
I hope I could provide you some ideas for your own setup of your shell environment. For me this setup works like a dream and makes it really fun and easy to work on the console. No matter how good the modern GUIs are, using the shell is sometimes still the best and fastest way to go.
Terminal Heaven Part 2: iTerm2
After laying the foundation to my Terminal Heaven in part 1 of this blog series, it’s now time to show you the next gem in my new toolchain: iTerm2.
The Max OS X Terminal.app is a very good terminal application and I have used it from the beginning and never had any problems with it. From time to time I had a look at the existing terminal alternatives but they were never really convincing. But after discovering iTerm2 it took me only 30 minutes from testing to finally replacing the Terminal.app icon in my dock!
iTerm2 has a lot of interesting features and I have to admit that I only use a few of them. But those features are really making the difference to me.
The most import feature for me is the handling of the double-click selection. The Terminal.app is only selecting text based on word boundaries. So double clicking in the middle of a file path in the Terminal.app gives you this:

Doing the same in iTerm2 gives you a much better result:

If you activate “Copy to clipboard on selection” in the preferences a simple double click on the file path followed by cmd-v will paste the complete path to your command line.
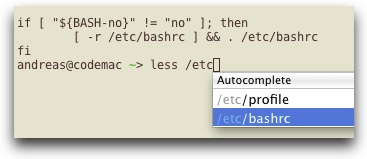
Also very helpful is the autocomplete feature. With this you can autocomplete everything from the current terminal text buffer. You don’t have to use the mouse anymore to get some text to your command line:
There are a lot more features which are also very useful like split panes, a good full screen mode and a good search function. The current version is stable and is performing really fast. So give it a try!
Next up in part 3: zsh and oh-my-zsh
Easy cPanel Backups
Backing up your website is something which everybody should do. But how can this be easily done? If your website is running on a cPanel powered hoster then you can do easy backups using the backup frontend of cPanel. If you want to do regular backups then it isn’t that easy anymore. That’s why I created a little shell script which helps you downloading the backup files to your local machine. The script is now available as open source on github.
To get the latest version of the script, execute the following command:
git clone https://github.com/code2k/cPanelBackup.git
Before you can use the script you have to configure it. The configuration is stored in a file in your homedir called .cpanelbackuprc. To create this file execute the following command:
./cPanelBackup.sh | tail -n +6 > cpanelbackuprc && mv cpanelbackuprc ~/.cpanelbackuprc
After that, just edit the generated file and adjust the values to your website environment. Then it’s time for a test run, so execute the script in the terminal:
./cPanelBackup.sh
If no error occurs you should end up with an archive containing your current website including your homedir, databases and email aliases. Congratulations!
To run the script daily just add the script to your crontab and your done.
Requirements
